Resistance Training With Rubber Tubing
To do these exercises, you will need a 24 in. (60 cm) length of rubber tubing with knots tied at each end. Check the rubber tubing each time you use it to be sure there are no holes or frayed areas. This will help you avoid having the tubing break during exercises.
As you begin each exercise, hold the tubing with your hands about shoulder-width apart. The tubing should be straight but not stretched out.
Stretch the tubing wider until you feel tension. And hold each exercise for a slow count of 5 (about 5 seconds). You may increase the time as you get stronger.
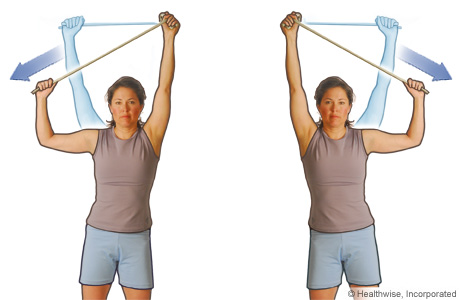
Side pull

- Raise both arms overhead, palms of your hands facing forward.
- Pull one arm down and to the side, bending your elbow as shown in the picture, and hold.
- Slowly reach up again. Repeat with the other arm.
- Repeat 8 to 12 times with each hand.
- Rest for a minute and repeat the exercise.
Overhead pull

- Raise both arms overhead, palms of your hands facing forward.
- Tighten the tubing by slowly pulling both arms away from center, and hold.
- Slowly return to the starting position with your arms straight up.
- Repeat 8 to 12 times.
- Rest for a minute and repeat the exercise.
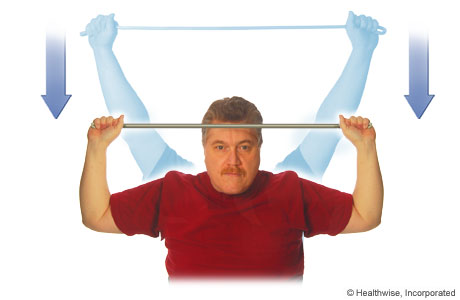
Up-down pull

- Raise both arms overhead.
- Bend your elbows so that they are shoulder-height, and hold the stretched tubing in front of your head.
- Slowly return to the starting position with your arms straight up.
- Repeat 8 to 12 times.
- Rest for a minute and repeat the exercise.
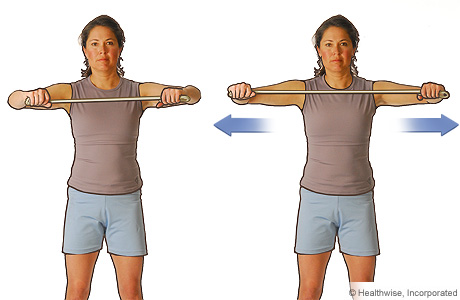
Chest-level pull

- Raise your arms in front of you to chest level. Your elbows will be bent and held up at about shoulder height.
- Pull your hands apart, stretching the tubing, and hold. Try to keep your hands up at your chest level, and do not pull your shoulders up toward your ears.
- Slowly return to your starting position.
- Repeat 8 to 12 times.
- Rest for a minute and repeat the exercise.
Hip-level pull

- Hold your hands at the level of your hips, or near your lap if you are sitting down.
- Pull your hands apart, stretching the tubing, and hold.
- Slowly return to your starting position.
- Repeat 8 to 12 times.
- Rest for a minute and repeat the exercise.
Current as of: December 7, 2017
Author: Healthwise Staff
Medical Review: E. Gregory Thompson, MD - Internal Medicine & Adam Husney, MD - Family Medicine & Kathleen Romito, MD - Family Medicine & Elizabeth T. Russo, MD - Internal Medicine